Pages

Tuesday, March 19, 2013

EYELASH ENHANCER: Mascara


Good morning!

It's a very hot, hot day today since summer is already here.

Anyways, don't let that be a hurdle for you to be beautiful. 
You're gonna be thinking, it's really hard for us girls here in the Philippines to wear make-up at this type of season because it will just all gonna melt on our faces, LOL!
That's true! hahaha

I would recommend that you wear minimal make-up. Few coats of mascara and few dabs of red lipstick will do. If you have thin eyebrows like mine, then you'll need to brush on some eyebrow powder/ pencil as well.  

For the mascara, I recommend you use a waterproof one so that it will not get washed away by the liters and liters of sweat you produce. lol!

Personally, I use Maybelline hypercurl Volum' Express Waterproof mascara.
It really lasts me the whole day.

love the curve
    The curve helps to lift up and curl my lashes.

without mascara
            

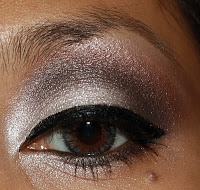
If you want your eyes to come alive, specially when your lashes are straight like mine, then wear mascara. 
You may curl your lashes first with an eyelash curler before applying the mascara.

w/ maybelline hypercurl (didn't use e/lash curler!)


Since it's waterproof, it won't be easy to remove. I suggest you wipe it first with cotton containing few drops of baby oil or if you have a make-up remover then use that instead of the oil before you wash your face.


That's it for now. Have a nice day!
:)

Monday, March 18, 2013

TRAVEL TIME: Baluarte de San Diego Gardens Intramuros

Baluarte de San Diego is located at the back of PLM or Pamantasan ng Lungsod ng Maynila in Intramuros.
Visitors may enter the garden for a fee of P75.00 for adults and P50.00 for students/child with valid ID

I went there during a function so entrance was free,  lol! We'll let's just say I got invited. 

I suggest you go there as early as 8 am because they won't allow any visitors anymore starting 12 noon if there's a function, usually wedding receptions. 


How to go to Baluarte de San Diego on a budget?
From EDSA...go to Guadalupe (Tulay) Bridge then ride a jeepney with Paco, Taft, Herran signboard. Fare is between P12- P16. Get off at Gen. Luna St. in Paco, Market where there are jeepneys waiting going to Pier. Tell the driver you will be getting off at Round Table. Fare is P8.00.


Entrance

From Quiapo, ride a jeepney with Mabini/ Baclaran signboard then get off at Round Table.

the path going to the Baluarte de San Diego

When you go down at Round Table, you will see the Dept. Of Labor and Employment Building. Go straight along Gen. Luna St. 
But for sure, you will be lucky enough to get off the jeepney with some PLM students, just follow them.
When you see the front or the PLM main gate, you may walk towards the left side and you will not miss it. 


took some snapshots


pretty fountain


Add caption

Too bad, I was not able to go to the upper part of the Baluarte. It is a must see!
I have already seen it before during the 90's but I wanted to have some snapshots of it today.
Well, I'll just visit this place next time.


Thank you for visiting! 'Till next time!


Sunday, March 17, 2013

Simple Prom Make-up: products used on hair

As promised, the hair products I used here:


JML Wet Straight Pro Hair Iron for the lovely big curls!


Applied first to damp hair V05 curl up to protect hair from heat before using the iron. It also help enhance the curls more. 
Then set the hair with just a few spritz of hair spray. I used lovely look hairspray. Please use this hairspray minimally as it will make the hair hard and it will really look hard. 

Thanks for viewing!
God bless!


Hair straightening iron: JML Wet Straight Pro


Wet Straight Pro by JML


I always wanted to buy a hair straightening iron but didn't know what brand to buy and I really wanted to buy a cheap one since I didn't have enough money. 
When I went inside an SM store in Cubao, I was looking at their flat irons when the saleslady ask me if I wanted to try the Wet straight pro. I asked her to use it on me as a curling iron since I already have straight hair. 

Sorry for the blurry photo!

I liked the curls that it made on my hair! 


The feature I liked about it is that it has a heat control setting and the lady told me that ceramic iron tends to break when it falls, unlike this one which is titanium plated.  
It is priced at P 2,549.75. I bought it with my eyes closed! LOL! It was too pricey for me but hey, I need to invest with some hair tools because I could use it for doing hair and make-up home service. 

Here are the features...


It also has a 2m salon length swivel power lead. 
The base of the cord rotates to prevent the cord from getting tangled or twisted. 


What I also liked about this is that it has these lines that could hold some pieces of hair while you curl it.


It has some holes that helps the water escape as they evaporate from your hair when you use it on wet/ damp hair.


It already comes with a bag so no need to buy one if you want to bring it with you on your travels.


When I went home with the product, I realized, we don't have a socket on our walls for this type.


Good thing my hubby found this one at home. I didn't know we have one :P


I used it on my daughter's unruly hair when I got home and it made her hair silky, straight and shiny instantly! 


This is what I did not like about Wet Straight Pro, the on/off button and the temperature button. 
It's an easy push button... SO EASY that I always hit on them whenever I use it, so sometimes I accidentally turn it off or increase the temperature.


So, would you invest on this one too?


Friday, March 15, 2013

CUTE NAIL ART: French tip w/ white flowers


How to do a French tip? 
If you're not a professional and just want a do it yourself french tip, here's a trick...
Stick on small pieces of tape on your nails. 
Just leave the part uncovered where you want to make a clean white tip. 
Do it on all nails. Two coats of white polish will do. 
Let it dry first then, peel/ remove the tape. 
After removing, apply a clear nail polish on the nails to protect the white tip that you've made.


I just added some cute white flowers with leaves. 
So nice!!! : )
Hope you try it. Good luck!

God bless!


CUTE NAIL ART: Tree


I love my cute nail art... a tree. 

I only tried this on one fingernail on my left hand and did not continue since i know I will have a hard time recreating this on my right hand because I am right handed. My left hand is very unsteady. ha ha ha!


After seeing what I've created, I feel a poem coming...
Let's all recite this lovely poem by Joyce Kilmer...

I think that I shall never see
A poem as lovely as a tree...


Let us save our trees!!!

God Bless!


Pageant make-up


I did a make-up for a pageant.
 I think it was two years ago and I just want to share it with you all.
Here it is...


Some of the brands I used were Young Blood loose foundation, Bloom for her eye shadow and Smashbox cosmetics for her cheeks and lips.

My model is sooo beautiful, inside and out!
It was really a pleasure of mine to be her make-up artist on that day.

She won the pageant!

God bless!


Simple PROM make-up

Here's a simple prom make-up. 
My model requested a NOT too made up look for her JS prom. Pink was their motif.
The hair...I used a hair straightening iron to create natural looking big curls. 


I am going to share with you the products I used on her hair. perhaps on my next post. 

Have a nice day!!! 

Thursday, March 14, 2013

CUTE NAIL ART

I love cute nail arts!!! 
I created this design. I used sliced Fimo sticks with fruit designs I bought at a nail store.


I don't really let my nails grow long because it's brittle...gets easily broken. But I think nail arts are cute even for short nails. 

:)

Affordable glue for false eye lashes


     Aido Eye Putti is useful for creating double eyelids w/ ease.
     It provides excellent adhesion of eyelashes.
     Comfortable and easy to use! 


Bought this at the Robinson's Department store in Ermita, Manila for 140 pesos.  Wanted to buy an eyelash adhesive that is affordable so went directly to the Fashion 21 counter since I know that this brand is very affordable.  Asked the consultant if they have an eyelash glue and she showed me this one. Nice! And as it says in the packaging, it can also be used for mono lids for creating double eyelids. Wow!!!  Saw an instructional video of this in You tube and thought that it was cool. As you can see in the photo, there is a small fork like thingy that you can use in creating double eyelids. 

Anyways, tried it at home with my new fake lash...

bought this one at the supermarket

I saw one in Divisoria and it's priced at 29 pesos. 

I used here the Aido eye putti and the fake lashes that I bought


has a brush tip


 I liked it because it has a brush tip applicator that you could use on the lids as instructed in the box or you could line the glue on the base of your fake lashes as I always do.  It adheres very good!


           That's it for now, thanks!!!

EYE SHADOW TUTORIAL: BEAM


One of my favorites from Smashbox is the smashing beam eye shadow palette. I do not know if they still have it today but I have had the palette for quite some time now. You may use other local eye shadow trio brand that have neutral shades like the affordable Fashion 21 trio eye shadow. Usually, trio eye shadows have the lightest, the medium and  the darkest shade, so you would be able to follow these easy steps. 
Let's start!

#1
First, apply the lightest shade in your palette of whatever brand you have all over the lid up to your brow bone. 

#2
Next,  apply the medium (color between the light and the dark shade) eye shadow. Start applying from the lash line up to the crease of the eyes. Also apply on the lower lash line.. 

#3

Then, apply the darkest shade in the palette on the crease of the eyes from the outer corner going in. Just follow the contour of your eyes.
Intensify as desired. You may dampen your eye shadow brush applicator with water for a more intense color. Apply also on lower part of eyes but just near the outer corner. Blend, blend, blend.

#4
     
Then apply your favorite eyeliner.  (optional)

#5 (sorry for this shot, e/s color is not as intense as the other photos)

You may want to apply white eyeliner in the lower rim of your eyes to make it look bigger.  But for a more dramatic look or for an evening event apply black eyeliner.  Don't forget your mascara!

     In picture #5 I applied Nichido Mineral Khol Pencil in onyx and Maybelline Volum' Express Hypercurl mascara.   

#6

Your eye shadow is done!  
      
In picture #6, I just intensified the contour a little more with the darkest eye shadow shade for the camera. And then applied some more color on my eyebrows.

You may wear your colored contact lens. (optional) 

    Voila! Do try this look.  You can do this!
       Good luck !!!   God bless!  Stay pretty!


EYE SHADOW TUTORIAL: VENUS


Let's name this tutorial Venus...because when you try this look, you'll look like a Godess!
Here it goes...


#1
Apply your base color. Here I used a shimmery white eye shadow all over lid up to the brow bone. Apply also on the lower part of the eye or lower lash line.

#2
Then apply black eye shadow on to the crease of your eye lid. Start from the outer corner fading towards the inner.
#3

Apply the shadow gradually. Remember... it is harder to blend if you already  put too much color on the first application.
#4
Also apply under the lower lash line fading towards the inner part. 

#5
Then apply red or maroon eye shadow on the part where the black and white meet on the brow bone. Just blend it in with a small fluffy eye shadow applicator brush or a blender brush for a lighter color application. Blend really well until the demarcation between the red and white e/s softens.     

#6
Then, apply your liquid or cream eyeliner.  Curl the lashes then put on some coats of mascara.  Applied here my favorite Maybelline Volum' Express Hypercurl mascara.

#7
Put on some falsies for that beauty queen fluttery lashes!

#8

Apply, eyebrow color with a brush for a much more blended softer brow color. 
Here, I used my favorite Smashbox browtech in Brunette.

After you have completed the eyes, apply bronzing powder on your cheeks, temples, forehead and chin.
Finish with a pale pink lipstick! You may want to apply gloss on top of your lipstick to create an illusion of a fuller lips.


GOD BLESS! 


God bless our new Pope!
POPE FRANCIS